In this tutorial, we will see Laravel 9 multi language route with Auth routes step by step. It’s easy to set up multi language in Laravel but it’s very hard to set up multi languages as a part of a URL like de/contact-us, it will work but the default Auth::routes() URLs like de/login, de/register, etc. won’t work. In this tutorial, we will see how to do that. Let’s just jump into it.
Step 1: Install Laravel 9
If you already have installed Laravel 9 on your local machine, you can skip this step. You can easily install the fresh version of Laravel 9 by running the below command in your terminal. You can give it any name but in this case, we will name it demo-app.
composer create-project --prefer-dist laravel/laravel demo-app
or use the following command to install the specific Laravel version
composer create-project laravel/laravel:^9.0 demo_app
Notes: To install Laravel 9 you need PHP 8.0. So make sure you have installed PHP 8.0 in your local WAMP, LAMP, MAMP, etc.
Step 2: Configure Database
In this step, we need to set the database credentials in the .env file. So grab your database credentials and add them into the .env file as below:
.env
DB_CONNECTION=mysql
DB_HOST=127.0.0.1
DB_PORT=3306
DB_DATABASE=mydatabase
DB_USERNAME=root
DB_PASSWORD=
Step 3: Install Breeze
The Laravel Breeze provides different basic authentication features, including login, registration, password reset, email verification, and password confirmation.
Run the below command to install the breeze Laravel package.
composer require laravel/breeze --dev
After running the above command, we need to run the breeze:install command which will create authentication views, routes, controllers, and other resources for your application. So run the below commands:
php artisan breeze:install
The Laravel Breeze will create CSS, JS & other assets so we need to compile these assets and then run the migrations. So run the below set of commands one by one:
npm install
npm run dev
php artisan migrate
Step 4: Set Route::group() For Locales
In this step, we need to add Route::group() for all the URLs. So let’s move all the routes inside of our Route::group(). so all the pages inside of the project will have the prefix of /[locale]/[page_name]. Here’s how it looks in routes/web.php:
<?php

use Illuminate\Support\Facades\Route;

// Redirect home with default language yourdomain.com/en/
Route::get('/', function () {
    return redirect(app()->getLocale());
});

Route::group(
    [
        'prefix' => '{locale}',
        'where' => ['locale' => '[a-zA-Z]{2}'],
        'middleware' => 'setlocale'
    ], function() {

    Route::get('/', function () {
        return view('welcome');
    });

    Route::get('/dashboard', function () {
        return view('dashboard');
    })->middleware(['auth'])->name('dashboard');

    require __DIR__.'/auth.php';
});
So above code will generate the URL like en/, en/dashboard, en/login, en/register, etc. routes.
We have also validated the {locale} route with the where condition. So the route will take only two letters from a to z & A to Z by using the below code:
Route::group([
  'prefix' => '{locale}',
  'where' => ['locale' => '[a-zA-Z]{2}']
], function() {
 ..............
});
Step 5: Create Middleware For Localization
Next, we need to create a middleware for the localization. By using the middleware we will set the default locale for all the routes. Let’s create a middleware for localization by running the below command:
php artisan make:middleware SetLocale
After running the above command a new file will be created in app\Http\Middleware\SetLocale.php. Open it and let’s add the below code to it.
<?php

namespace App\Http\Middleware;

use Closure;
use Illuminate\Http\Request;

class SetLocale
{
    public function handle(Request $request, Closure $next)
    {
        app()->setLocale($request->segment(1));
        return $next($request);
    }
}
The code $request->segment(1) will return our {locale} route part of the URLs for example, en, de, nl, eo, et, etc. so we set the app locale on all requests.
Then we need to register our newly created middleware in the app/Http/Kernel.php to the $routeMiddleware array as below:
protected $routeMiddleware = [
    'auth' => \App\Http\Middleware\Authenticate::class,
    'auth.basic' => \Illuminate\Auth\Middleware\AuthenticateWithBasicAuth::class,
    'cache.headers' => \Illuminate\Http\Middleware\SetCacheHeaders::class,
    'can' => \Illuminate\Auth\Middleware\Authorize::class,
    'guest' => \App\Http\Middleware\RedirectIfAuthenticated::class,
    'password.confirm' => \Illuminate\Auth\Middleware\RequirePassword::class,
    'signed' => \Illuminate\Routing\Middleware\ValidateSignature::class,
    'throttle' => \Illuminate\Routing\Middleware\ThrottleRequests::class,
    'verified' => \Illuminate\Auth\Middleware\EnsureEmailIsVerified::class,
    'setlocale' => \App\Http\Middleware\SetLocale::class,
];
After that, let’s add the middleware to the Route::group() function in the routes/web.php file as below:
Route::group(
    [
        'prefix' => '{locale}',
        'where' => ['locale' => '[a-zA-Z]{2}'],
        'middleware' => 'setlocale'
    ], function() {
.....................
});
Hurray! we have completed lots of basic steps for Laravel 9 multi language routes with Auth routes but still, we need to cover lots of things. Don’t give up. Let’s go ahead.
Step 6: Homepage Auto Redirection With Locale
We need to redirect the homepage from yourdomain.com/ to yourdomain.com/{locale} automatically in Laravel 9. To do that, let’s add a single line in the routes/web.php file. Open it and add the below:
Route::get('/', function () {
    return redirect(app()->getLocale());
});
The above code will generate your homepage or welcome page URL something like yourdomain.com/en.
Step 7: Add Localization Parameter To All Existing Links
Let’s try to visit our app and what you will see is an error something like the below screenshot.
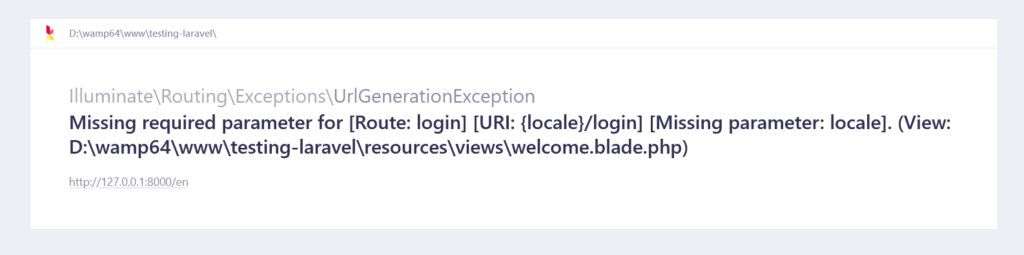
You might have a question in your mind why are we seeing this error. The simple answer to that question is we have generated our Auth using Laravel Breeze. So all the routes used by Laravel in the blade, controllers, etc. are auto-generated so we need to add the {locale} parameter into all the routes.
So we need to edit all the views in the resources/views/ directory and change all route() calls to pass one more parameter of app()->getLocale(). For example, this is the change in resources/views/welcome.blade.php:
Before Change:
<a href="{{ route('login') }}" class="text-sm text-gray-700 dark:text-gray-500 underline">Log in</a>

@if (Route::has('register'))
    <a href="{{ route('register') }}" class="ml-4 text-sm text-gray-700 dark:text-gray-500 underline">Register</a>
@endif
After Change:
<a href="{{ route('login', app()->getLocale()) }}" class="text-sm text-gray-700 dark:text-gray-500 underline">Log in</a>

@if (Route::has('register'))
    <a href="{{ route('register', app()->getLocale()) }}" class="ml-4 text-sm text-gray-700 dark:text-gray-500 underline">Register</a>
@endif
You need to repeat this process for all the blade files. Let’s try to change the other views, like resources/views/auth/login.blade.php – we add parameters to all login & forgot password routes:
<x-guest-layout>
    <x-auth-card>
        <x-slot name="logo">
            <a href="/">
                <x-application-logo class="w-20 h-20 fill-current text-gray-500" />
            </a>
        </x-slot>

        <!-- Session Status -->
        <x-auth-session-status class="mb-4" :status="session('status')" />

        <!-- Validation Errors -->
        <x-auth-validation-errors class="mb-4" :errors="$errors" />

        <form method="POST" action="{{ route('login', app()->getLocale()) }}">
            @csrf

            <!-- Email Address -->
            <div>
                <x-label for="email" :value="__('Email')" />

                <x-input id="email" class="block mt-1 w-full" type="email" name="email" :value="old('email')" required autofocus />
            </div>

            <!-- Password -->
            <div class="mt-4">
                <x-label for="password" :value="__('Password')" />

                <x-input id="password" class="block mt-1 w-full"
                                type="password"
                                name="password"
                                required autocomplete="current-password" />
            </div>

            <!-- Remember Me -->
            <div class="block mt-4">
                <label for="remember_me" class="inline-flex items-center">
                    <input id="remember_me" type="checkbox" class="rounded border-gray-300 text-indigo-600 shadow-sm focus:border-indigo-300 focus:ring focus:ring-indigo-200 focus:ring-opacity-50" name="remember">
                    <span class="ml-2 text-sm text-gray-600">{{ __('Remember me') }}</span>
                </label>
            </div>

            <div class="flex items-center justify-end mt-4">
                @if (Route::has('password.request'))
                    <a class="underline text-sm text-gray-600 hover:text-gray-900" href="{{ route('password.request', app()->getLocale()) }}">
                        {{ __('Forgot your password?') }}
                    </a>
                @endif

                <x-button class="ml-3">
                    {{ __('Log in') }}
                </x-button>
            </div>
        </form>
    </x-auth-card>
</x-guest-layout>
After changing the above routes, you can visit the /en will show you the welcome page, and /en/login will show you the login page without error.
Step 8: Add Localization Parameter To Login & Registration Redirection
So you know after login and registration, the user will be redirected to the Dashboard or Login page that’s the Laravel default setting. As we have done in the above step, we also need to do the same thing to add the app()->getLocale() in those routes also.
Go to the app\Http\Controllers\Auth\RegisteredUserController.php and replace the redirect() function with the below:
return redirect(app()->getLocale().RouteServiceProvider::HOME);
The same for app\Http\Controllers\Auth\AuthenticatedSessionController.php
return redirect()->intended(app()->getLocale().RouteServiceProvider::HOME);
That’s it, now after the login and after successful registration, you will be redirected to the Dashboard. You might also require to set similar things for other Controllers as well.
Step 9: Language Switcher In Laravel
Hurray! we have almost completed all the steps to setup Laravel 9 multi language routes with Auth routes but further, we would like to show you how to implement the Language switcher in Laravel 9 as below screenshot:

It’s actually really simple, as we have all the inbuilt systems ready for it.
First, let’s define the array of possible languages that we wanted to use in our app. To do that go to the config/app.php and we will add an array of available_locales like below:
.....

'locale' => 'en',

'available_locales' => [
    'en',
    'de',
    'fr'
],

......
Then run the php artisan config:clear command to clear the config cache.
After that, in the top section of resources/views/layouts/navigation.blade.php we need to add the @foreach loop:
@foreach (config('app.available_locales') as $locale)
<x-dropdown-link :href="route(request()->route()->getName(), $locale)">
    <span @if (app()->getLocale() == $locale)
        style="font-weight: bold; text-decoration: underline"
        @endif>
        {{ strtoupper($locale) }}
    </span>
</x-dropdown-link>
@endforeach
The above code explanation:
- We are taking the list of languages from
config(‘app.available_locales’)that we had just created above. - We are giving the href link to the same current route but with a different language – for that, we are using request()->route()->getName() method.
- Also, we are adding an active language style by checking the
app()->getLocale() == $localecondition. - Finally, we’re showing the language itself in uppercase mode with
strtoupper($locale).
Step 10: Adding Translations In Laravel
The last but not least step is to add the translations in Laravel. Laravel by default set the EN as a default language. So we need to add the translations for other languages. Let’s add translations for the FR language.
To create FR language translations, we need to create a fr.json file in resources/lang/fr.json and add the following translations:
{
    "Log in": "Se connecter",
    "Email": "E-mail",
    "Password": "Mot de passe",
    "Remember me": "Se souvenir de moi",
    "Forgot your password?": "Mot de passe oublié?",
    "Dashboard": "Tableau de bord",
    "You're logged in!": "Vous êtes connecté !"
}
You need to add separate .json files for all the translations like de.json, en.json, etc.
Just make sure you are using the __() (double underscore) helper method while printing the string in the blade files. The __() (double underscore) method is used to retrieve translation strings from your language files.
echo __('I love programming.');

{{ __('Log in') }}

{{ __('Dashboard') }}
Step 11: Output – Laravel 9 Multi Language Routes With Auth Routes
Hurray! We have completed all steps for the Laravel 9 multi language routes with Auth routes tutorial with an example. Let’s run the below command and see how it’s working.
php artisan serve
After running the above command, open your browser and visit the site below URL:
http://127.0.0.1:8000/fr/login


Additionally, read our guide:
- Laravel 9 Image Upload Tutorial With Example
- Laravel 9 Multiple Database Connections Example
- Laravel 9 Automatically Generates Sitemap With Example
- Make Model In Laravel 9 Tutorial With Example
- Laravel Firebase Tutorial With Example
- Multiple File Upload In Laravel 9 With Example
- Laravel 9 Multiple Images Upload Example
- Show All Fields Of Model In Django Admin
- Laravel: Increase Quantity If Product Already Exists In Cart
- How To Update Pivot Table In Laravel
- How To Install Vue In Laravel 8 Step By Step
- How To Handle Failed Jobs In Laravel
- Best Ways To Define Global Variable In Laravel
- How To Get Latest Records In Laravel
- Laravel Twilio Send SMS Tutorial With Example
- How To Pass Laravel URL Parameter
- Set Default Value Of Timestamp In Laravel Migration
- Laravel 9 File Upload Tutorial With Example
- How To Schedule Tasks In Laravel With Example
- Laravel Collection Push() And Put() With Example
That’s it from our end. We hope this article helped you to learn Laravel 9 multi language routes with Auth routes tutorial with an example.
Please let us know in the comments if everything worked as expected, your issues, or any questions. If you think this article saved your time & money, please do comment, share, like & subscribe. Thank you for reading this post 🙂 Keep Smiling! Happy Coding!