In this amazing tutorial, we will learn Laravel upload files to the AWS s3 bucket. We will use the Laravel file system to upload files to the AWS s3 bucket. We will also fetch and show the image from the AWS s3 bucket. So let’s just jump into it.
We will first see how to create an AWS s3 bucket step by step and then we will jump into the Laravel file upload mechanism.
Step 1: Create S3 Bucket
First, we will create an AWS S3 bucket and IAM User so let’s just do it.
1. Go to the Amazon Web Service Console and create your account. If you already have it then log in.
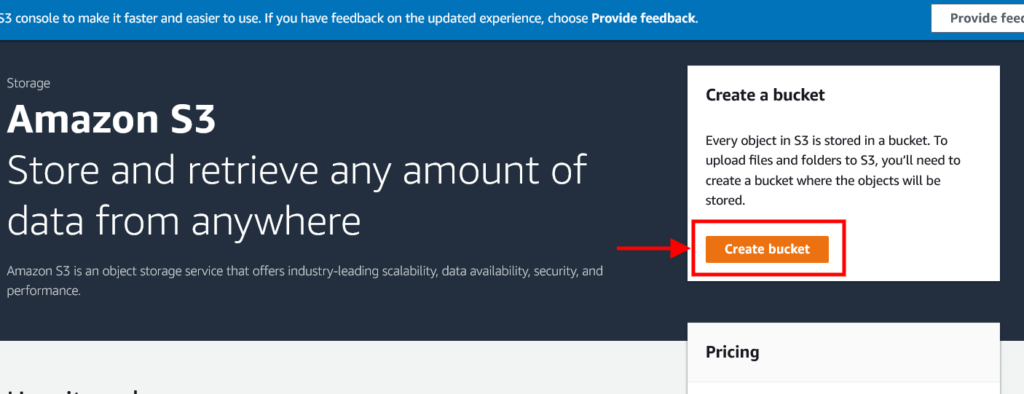
2. Now, go to All Services and select S3 from storage as shown in the below screenshot or you can search the “S3” from the search bar.

3. After clicking on S3 Storage, it will take you to the below screen and click on the “Create Bucket” button.
4. Then, you will see the S3 bucket list screen. Again click on the “Create bucket” button.
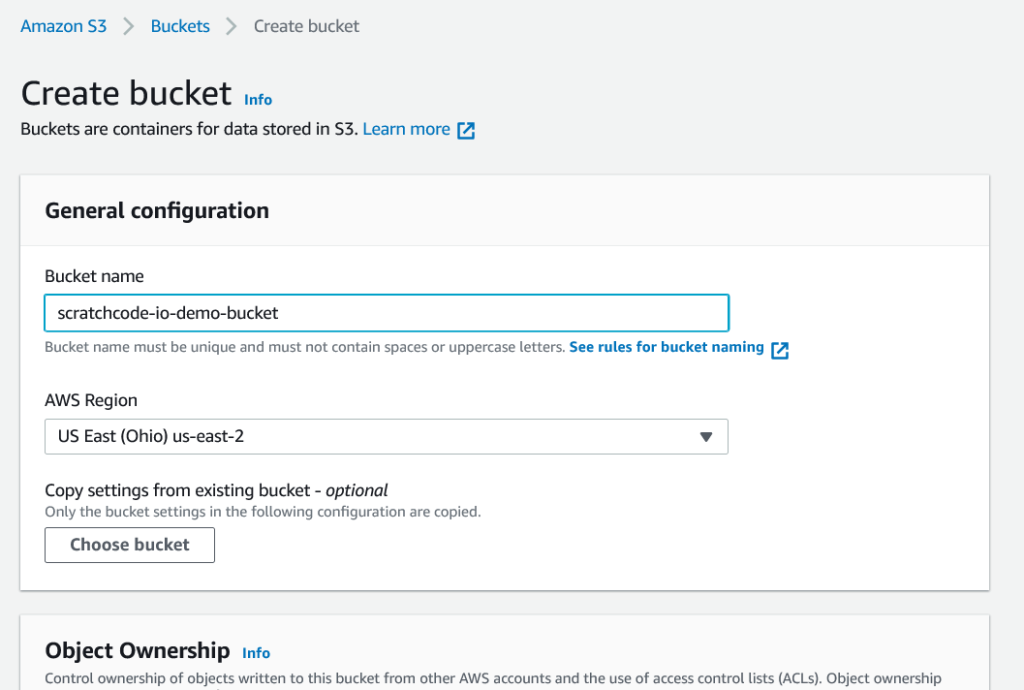
5. After that, you will see create a bucket form. For now, we need to add “Bucket name” but you can add all the details as per your requirement and click on the “Create bucket” button at the end of the screen.
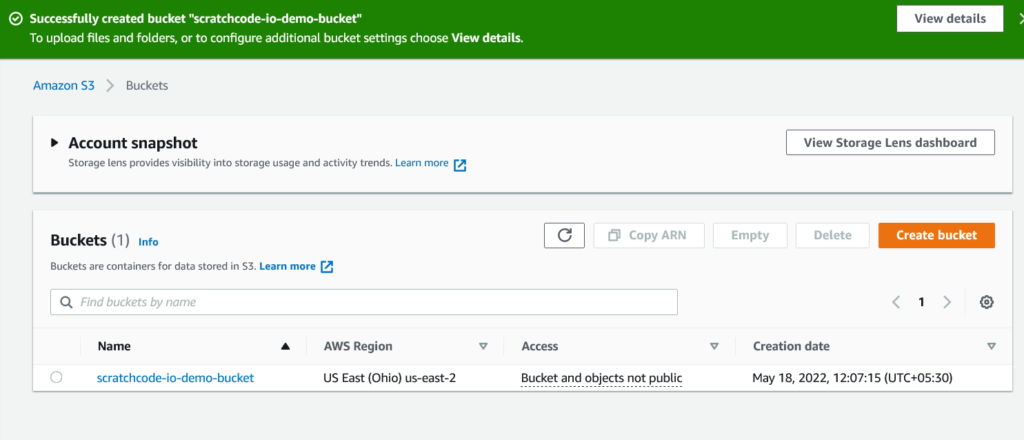
6. Now, you will see the bucket list screen with a success message as below screenshot.
7. Now, we need an IAM user who can access the bucket list and upload the file from Laravel. To create an IAM User click here. Also, you can search the IAM from the service list and then select users.
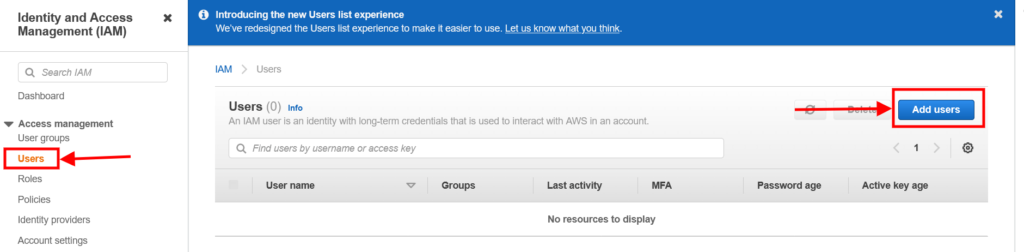
Click on the “Add users” button as shown above.
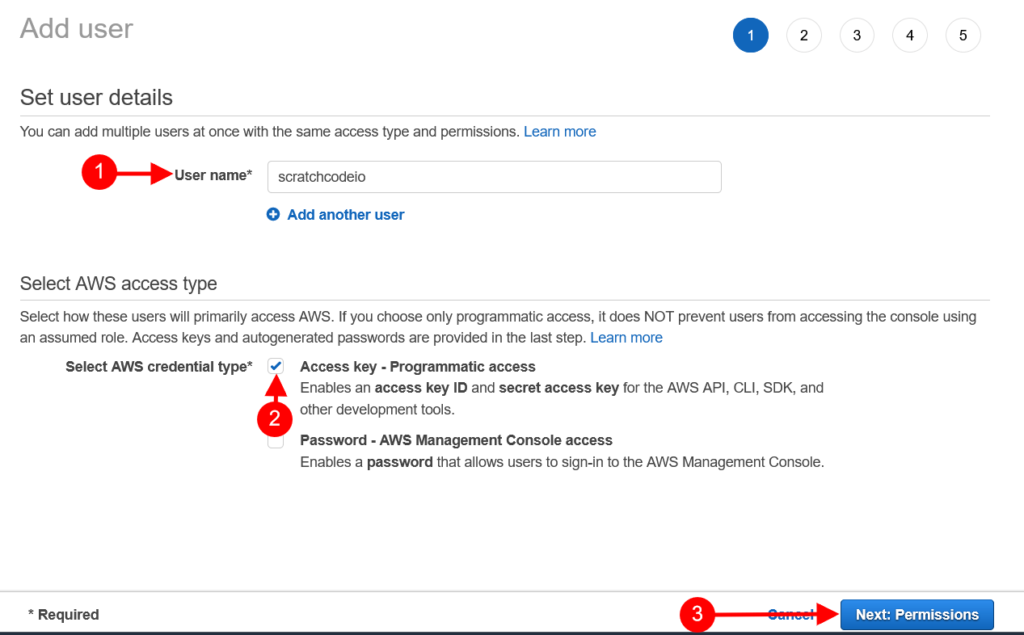
8. You will see the add user form. Next, Add the “User name” and select the “Access key – Programmatic access” and click on Next button.
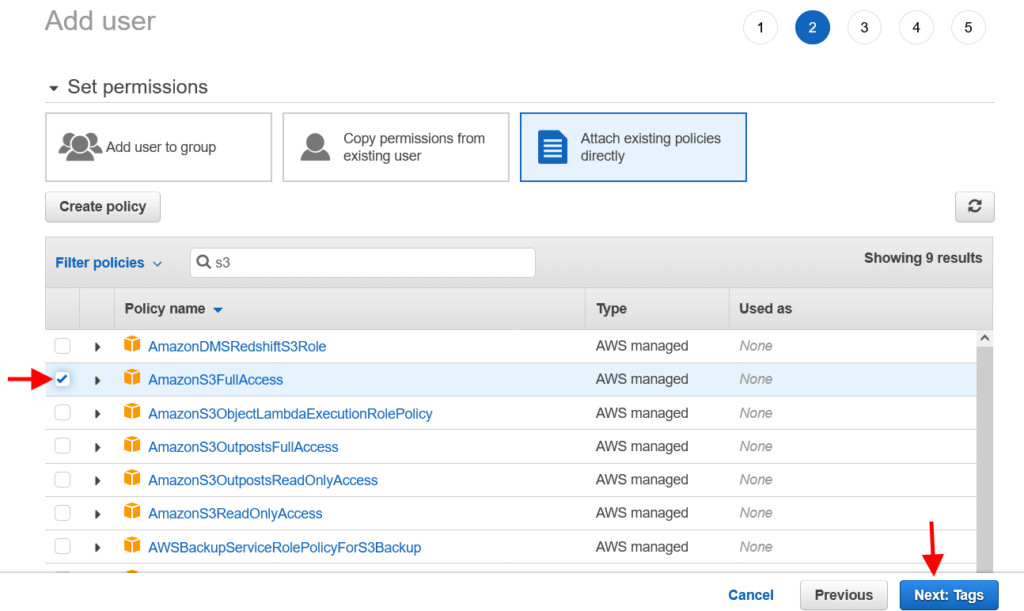
9. In the next step, select the “Attach Existing Policy Directly” tab and choose the “AmazonS3FullAccess” from the permissions list and then click on the Next button.
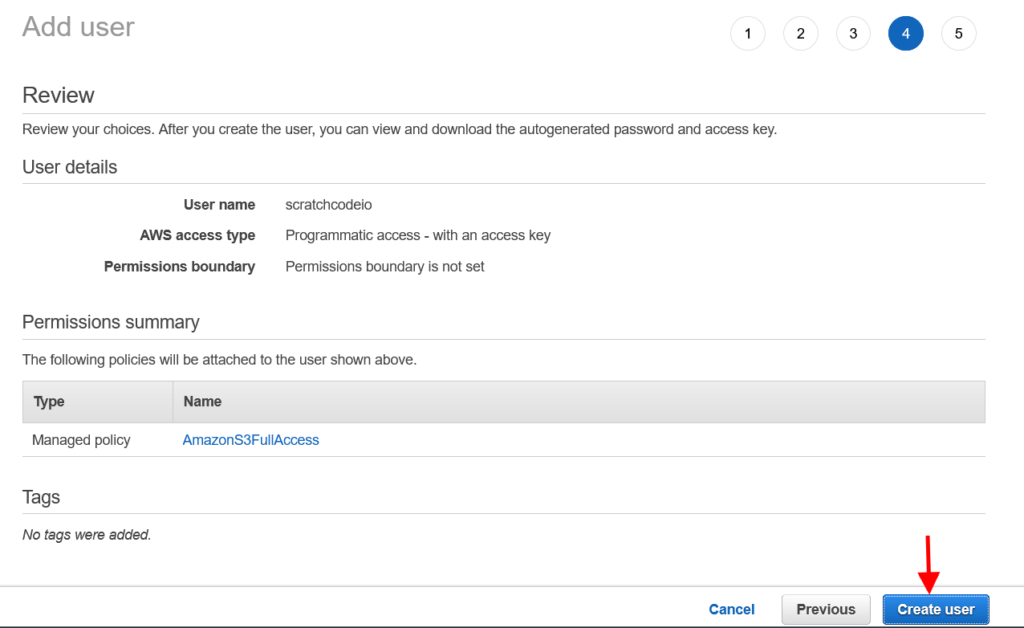
10. You can skip the Tags step at its optional. Click on the Next button from the Tags step. In the next step, you will see the user review step to verify the entered details and then click on the “Create user” button as shown in the below screenshot:
11. Now you will see a success message with the newly created user list as below screenshot. There are “Access Key ID” and “Secret Access Key” that we need on .env file to connect Laravel & AWS S3 bucket.

Step 2 Install Laravel
If you already have the Laravel installed on your machine then you can skip this step. To install a fresh version of Laravel run the below command in your terminal.
composer create-project --prefer-dist laravel/laravel demo-app
Step 3 Install AWS S3 Filesystem Package
In this step, we need to install Flysystem adapter for the AWS S3 SDK v3.x in our newly created Laravel app. This package will help us to connect with AWS S3 with minimal effort. Run the below command in your terminal to install the package.
composer require --with-all-dependencies league/flysystem-aws-s3-v3 "~1.0"
Step 4 Configure AWS S3 Credentials In .env File
We need to add the AWS credentials that we have created in Step 11 while creating the S3 bucket. So copy those credentials and add them like below in your .env file:
.env
AWS_ACCESS_KEY_ID=AKIA5CK4UB3W...
AWS_SECRET_ACCESS_KEY=CrRDMHkzwq2RMb....
AWS_DEFAULT_REGION=us-east-2
AWS_BUCKET=scratchcode-io-demo-bucket
AWS_USE_PATH_STYLE_ENDPOINT=false
Notes: After adding credentials in the .env file, don’t forget to run the php artisan config:clear command.
Step (Important): Set
httpScheme In S3 Filesystem
If you are running your web app without https protocol then you have to follow this else you will get the aws http error: curl error 60: ssl certificate problem: unable to get local issuer certificate error.
Open the config\filesystems.php and add the 'scheme' => 'http' in ‘s3’ array like below:
config\filesystems.php
's3' => [
    'driver' => 's3',
    'key' => env('AWS_ACCESS_KEY_ID'),
    'secret' => env('AWS_SECRET_ACCESS_KEY'),
    'region' => env('AWS_DEFAULT_REGION'),
    'bucket' => env('AWS_BUCKET'),
    'url' => env('AWS_URL'),
    'endpoint' => env('AWS_ENDPOINT'),
    'use_path_style_endpoint' => env('AWS_USE_PATH_STYLE_ENDPOINT', false,
    'scheme'  => 'http'
],
Step 5 Create Routes
We need to add two routes in the routes/web.php file to perform the file upload on the AWS S3 bucket using Laravel. First GET route to show file upload form and another route for post method.
routes/web.php
<?php

use Illuminate\Support\Facades\Route;
use App\Http\Controllers\FileUploadController;

Route::get('file-upload', [ FileUploadController::class, 'getFileUploadForm' ])->name('get.fileupload');
Route::post('file-upload', [ FileUploadController::class, 'store' ])->name('store.file');
Step 6 Create FileUploadController
Let’s create a FileUploadController and let’s add those two methods that we have added in the routes file getFileUploadForm() and store().
app/Http/Controllers/FileUploadController.php
<?php

namespace App\Http\Controllers;

use Illuminate\Http\Request;
use Illuminate\Support\Facades\Storage;

class FileUploadController extends Controller
{
    public function getFileUploadForm()
    {
        return view('file-upload');
    }

    public function store(Request $request)
    {
        $request->validate([
            'file' => 'required|mimes:doc,csv,txt|max:2048',
        ]);

        $fileName = $request->file->getClientOriginalName();
        $filePath = 'uploads/' . $fileName;

        $path = Storage::disk('s3')->put($filePath, file_get_contents($request->file));
        $path = Storage::disk('s3')->url($path);

        // Perform the database operation here

        return back()
            ->with('success','File has been successfully uploaded.');
    }
}
Notes: To validate doc, docx you need to create mimes.php in config directory and add the following content.
config/mimes.php
<?php

return [
    'doc'  => array('application/msword', 'application/vnd.ms-office'),
    'docx' => array('application/vnd.openxmlformats-officedocument.wordprocessingml.document', 'application/zip'),
];
Step 7 Create Blade/HTML File
At last, we need to create a file-upload.blade.php file in the views folder and in this file, we will add the file upload Form HTML.
resources/views/file-upload.blade.php
<!DOCTYPE html>
<html>
   <head>
      <title>Laravel Upload File With Amazon S3 Bucket - ScratchCode.io</title>
      <link rel="stylesheet" href="https://maxcdn.bootstrapcdn.com/bootstrap/4.0.0/css/bootstrap.min.css">
   </head>
   <body>
      <div class="container">
         <div class="panel panel-primary">
            <div class="panel-heading">
               <h2>Laravel Upload File With Amazon S3 Bucket- ScratchCode.io</h2>
            </div>
            <div class="panel-body">
               @if ($message = Session::get('success'))
	               <div class="alert alert-success alert-block">
	                  <button type="button" class="close" data-dismiss="alert">×</button>
	                  <strong>{{ $message }}</strong>
	               </div>
               @endif

               @if (count($errors) > 0)
               <div class="alert alert-danger">
                  <strong>Whoops!</strong> There were some problems with your input.
                  <ul>
                     @foreach ($errors->all() as $error)
                     <li>{{ $error }}</li>
                     @endforeach
                  </ul>
               </div>
               @endif

               <form action="{{ route('store.file') }}" method="POST" enctype="multipart/form-data">
                  @csrf
                  <div class="row">
                     <div class="col-md-6">
                        <input type="file" name="file" class="form-control"/>
                     </div>
                     <div class="col-md-6">
                        <button type="submit" class="btn btn-success">Upload File...</button>
                     </div>
                  </div>
               </form>
            </div>
         </div>
      </div>
   </body>
</html>
Hurray! We have completed all steps to file upload on the AWS S3 bucket using Laravel. Let’s run the below command and see how it’s working.
php artisan serve
After running the above command, open your browser and visit the site below URL:
http://localhost:8000/file-uploadStep 8 Output

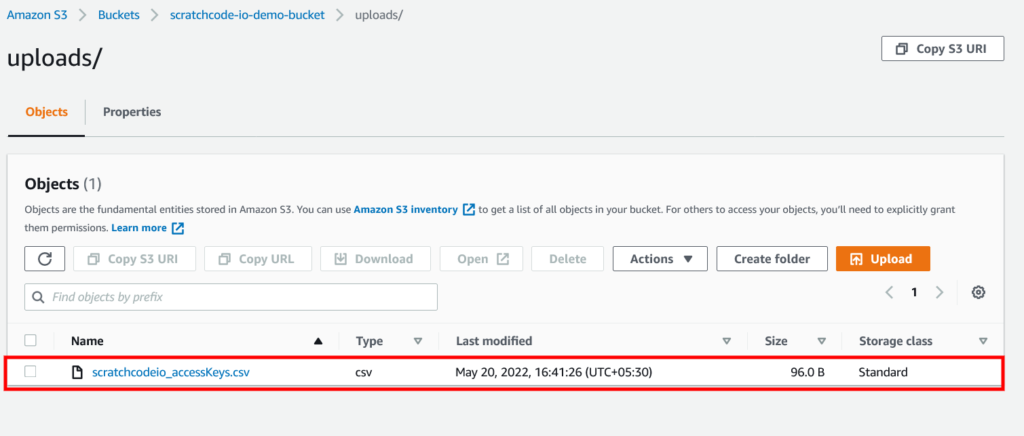
AWS S3 Bucket Output:
Once we successfully uploaded our file then it will look like the following on the AWS S3 bucket.
Additionally, read our guide:
- Laravel: Blade Switch Case Statement Example
- Laravel: Switch Case Statement In Controller Example
- Laravel: Change Column Type In Migration
- Laravel: Change Column Name In Migration
- How To Use Where Date Between In Laravel
- How To Add Laravel Next Prev Pagination
- Laravel Remove Column From Table In Migration
- Laravel: Get Month Name From Date
- Laravel: Increase Quantity If Product Already Exists In Cart
- How To Update Pivot Table In Laravel
- How To Install Vue In Laravel 8 Step By Step
- How To Handle Failed Jobs In Laravel
- Best Ways To Define Global Variable In Laravel
- How To Get Latest Records In Laravel
- How To Break Nested Loops In PHP Or Laravel
- How To Pass Laravel URL Parameter
- Laravel Run Specific Migration
- Laravel Paypal Integration Tutorial With Example
- How To Schedule Tasks In Laravel With Example
- Laravel Collection Push() And Put() With Example
That’s it from our end. We hope this article helped you to learn the Laravel upload files to the AWS S3 bucket.
Please let us know in the comments if everything worked as expected, your issues, or any questions. If you think this article saved your time & money, please do comment, share, like & subscribe. Thank you for reading this post 🙂 Keep Smiling! Happy Coding!

Hi,
Thanks for these.
This is very help full.
Please update following code. Here some developer may confuse.
$path = Storage::disk(‘s3’)->put($filePath, file_get_contents($request->file(‘image’)));
Your code:$path = Storage::disk(‘s3’)->put($filePath, file_get_contents($request->file));
Error : Path can not be empty