In this article, we will see how to send an AJAX PHP post request with an example. Generally, a POST request is used to send the data to a PHP file then we can use that data, process it like validation checking, data saving, mail sending, etc, and then PHP will send the response with the message, data, response code, etc.
Why We Use AJAX?
AJAX is used to perform various HTTP requests like POST, GET, PUT, etc. AJAX is used to update the part of the webpage without reloading a page. Overall, it will improve the user experience.
For example, Let’s say we are using jQuery AJAX Post request for login form so in this, we will send username and password to the PHP file. In that file, we will check the username and password into the database and allow login users or show them an error message in the login form.
Where We Can Use AJAX?
We can use AJAX everywhere on the website. Let’s see very useful places where AJAX is used.
- Login form to validate the user and redirect the user if successful or show messages on the form
- Registration form to insert data into the database, email and show server-side validations, etc
- Sending contact us form’s email and show success or error message on the form
- AJAX is used in data-tables to fetch only required data to overcome load on servers
- For the pagination of posts, tables, load more button effect, etc.
- Autocomplete search like you type Au and it brings the lists with Au words
- To create filters like pricing filters, colors filters, category filters, etc
Use jQuery $.ajax() Method To Send HTTP Request
Different users follow different ways to send data using AJAX. Let’s see how to do that.
1. AJAX: Send Data Using Object Parameters
To send in parameters, you need to create a JavaScript object. So to do that you need to get values using .val() function and create an object using it something like below.
But what if you have a large number of fields in your form in that case you need to submit the whole form data one by one but that isn’t a good idea right? In that case, use the second option after this point.
let firstName = $('#firstname').val(),
    lastName = $('#lastname').val(),
    message = $('#message').val();

$.ajax({
    method: "POST",
    url: 'file.php',
    data: { firstname: firstName, lastname: lastName, message: message },
    success: function(response){
        console.log(response);
    },
    error: function(xhr, status, error){
        console.error(xhr);
    }
});
2. AJAX: Send Whole Form Data Using serialize() & serializeArray() Methods
serialize() method creates data in query string format so due to that submitting a file with this function won’t work.
serializeArray() method creates data in JavaScript array objects.
Suppose, you have a form and you want to submit the whole form data using AJAX then you can do something like the below:
let formData = $('#myForm').serialize();
/* Or use serializeArray() function same as serialize()
let formData = $('#myForm').serializeArray(); */

$.ajax({
    method: "POST",
    url: 'file.php',
    data: formData,
    success: function(response){
        console.log(response);
    },
    error: function(xhr, status, error){
        console.error(xhr);
    }
});
3. AJAX: Send Whole Form Data Using FormData() methods
The FormData() is a constructor that creates a new FormData object as below:
let myForm = document.getElementById('myForm');
let formData = new FormData(myForm);

$.ajax({
    method: "POST",
    url: 'file.php',
    data: formData,
    success: function(response){
        console.log(response);
    },
    error: function(xhr, status, error){
        console.error(xhr);
    }
});
If you want to append extra key-value pair in FormData() object then you can use obj.append(‘key’, ‘value’) function as below:
formData.append('action', 'insert');
4. User Registration Using AJAX PHP Post Request
In this example, we will submit a simple registration form using AJAX PHP Post request.
index.php
<!DOCTYPE html>
<html lang="en">
<head>
<meta charset="utf-8" />
<meta name="viewport" content="width=device-width, initial-scale=1, shrink-to-fit=no" />
<link rel="stylesheet" href="https://fonts.googleapis.com/css?family=Roboto:400,700" />
<title>AJAX PHP Post Request</title>
<link rel="stylesheet" href="https://stackpath.bootstrapcdn.com/bootstrap/4.5.0/css/bootstrap.min.css" />
<link rel="stylesheet" href="https://maxcdn.bootstrapcdn.com/font-awesome/4.7.0/css/font-awesome.min.css" />
<style>
body {
color: #fff;
background: #3598dc;
font-family: "Roboto", sans-serif;
}
.form-control {
height: 41px;
background: #f2f2f2;
box-shadow: none !important;
border: none;
}
.form-control:focus {
background: #e2e2e2;
}
.form-control,
.btn {
border-radius: 3px;
}
.signup-form {
width: 400px;
margin: 30px auto;
}
.signup-form form {
color: #999;
border-radius: 3px;
margin-bottom: 15px;
background: #fff;
box-shadow: 0px 2px 2px rgba(0, 0, 0, 0.3);
padding: 30px;
}
.signup-form h2 {
color: #333;
font-weight: bold;
margin-top: 0;
}
.signup-form hr {
margin: 0 -30px 20px;
}
.signup-form .form-group {
margin-bottom: 20px;
}
.signup-form input[type="checkbox"] {
margin-top: 3px;
}
.signup-form .row div:first-child {
padding-right: 10px;
}
.signup-form .row div:last-child {
padding-left: 10px;
}
.signup-form .btn {
font-size: 16px;
font-weight: bold;
background: #3598dc;
border: none;
min-width: 140px;
}
.signup-form .btn:hover,
.signup-form .btn:focus {
background: #2389cd !important;
outline: none;
}
.signup-form a {
color: #fff;
text-decoration: underline;
}
.signup-form a:hover {
text-decoration: none;
}
.signup-form form a {
color: #3598dc;
text-decoration: none;
}
.signup-form form a:hover {
text-decoration: underline;
}
.signup-form .hint-text {
padding-bottom: 15px;
text-align: center;
}
#responseContainer {
display: none;
}
</style>
</head>
<body>
<div class="signup-form">
<form name="registrationForm" id="registrationForm" action="" method="post">
<input type="hidden" name="action" value="registration"/>
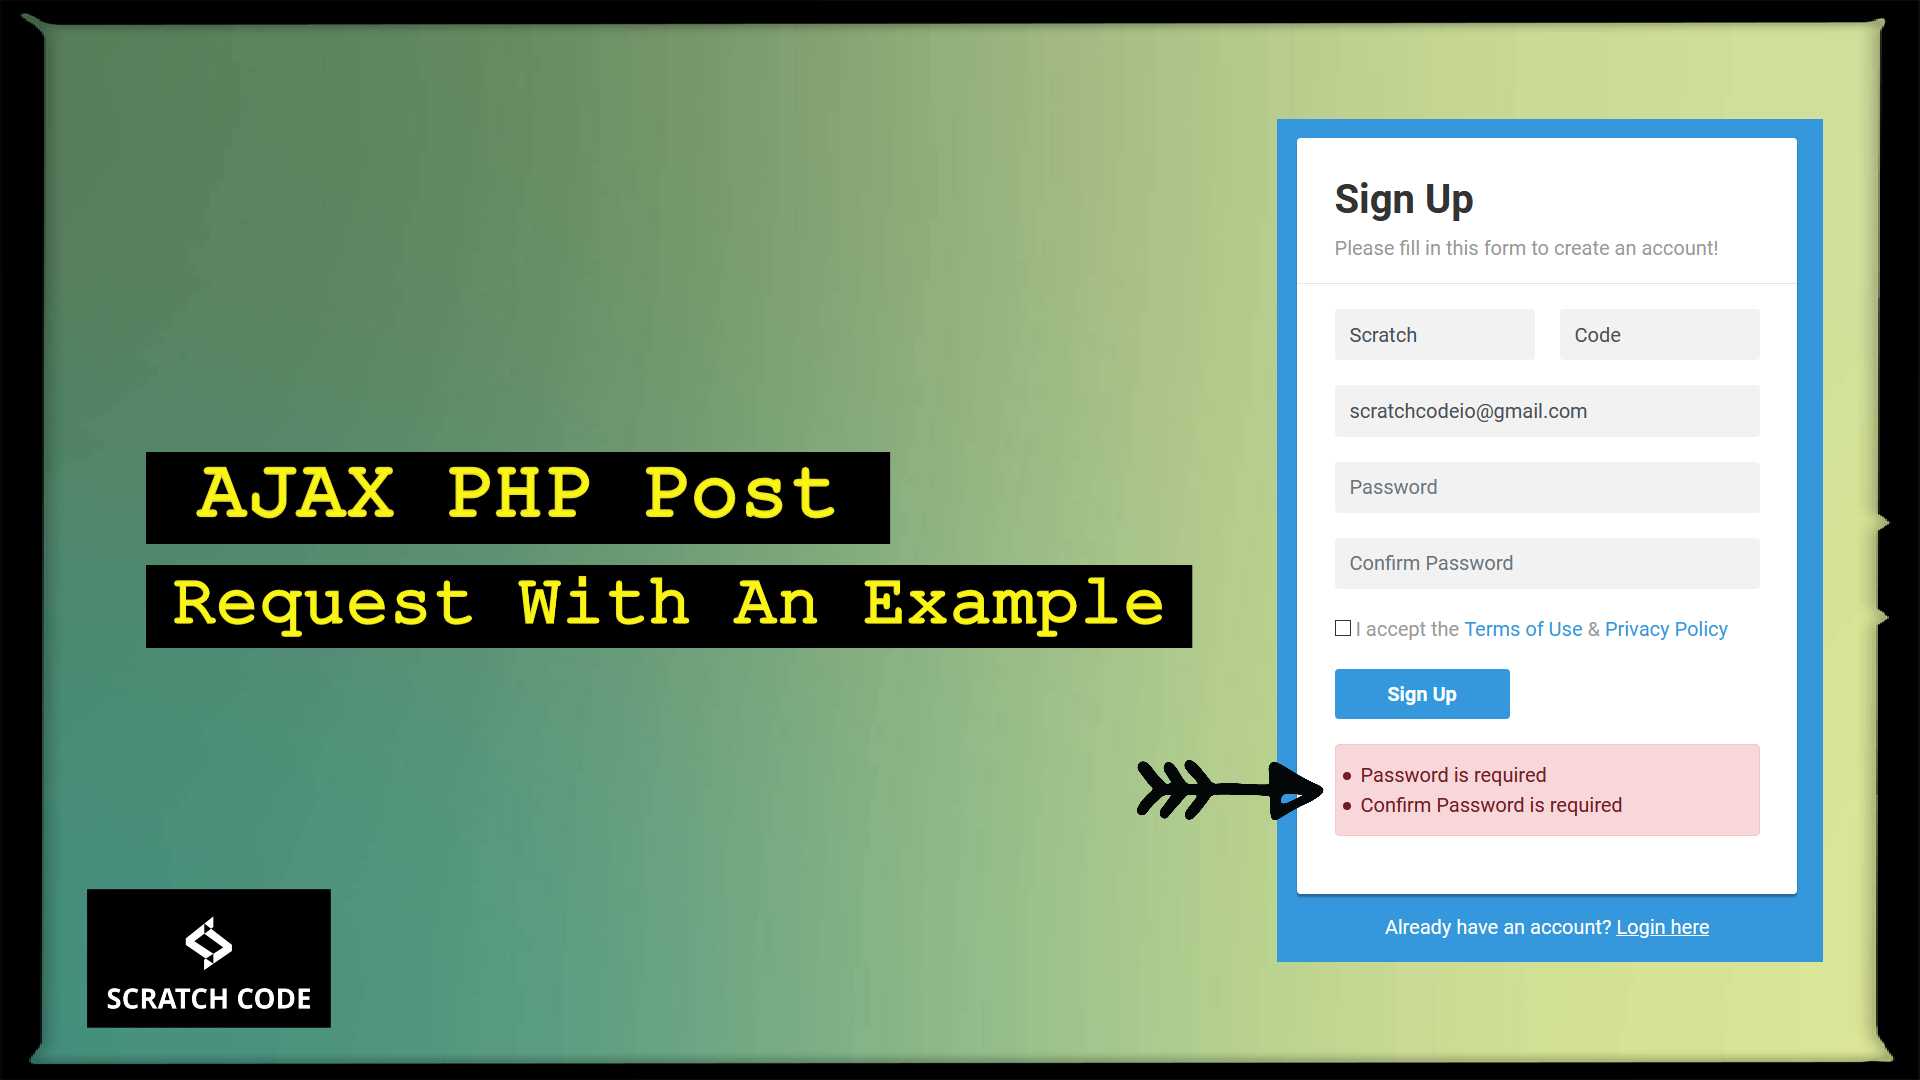
<h2>Sign Up</h2>
<p>Please fill in this form to create an account!</p>
<hr />
<div class="form-group">
<div class="row">
<div class="col"><input type="text" class="form-control" name="first_name" placeholder="First Name" /></div>
<div class="col"><input type="text" class="form-control" name="last_name" placeholder="Last Name" /></div>
</div>
</div>
<div class="form-group">
<input type="email" class="form-control" name="email" placeholder="Email" />
</div>
<div class="form-group">
<input type="password" class="form-control" name="password" placeholder="Password" />
</div>
<div class="form-group">
<input type="password" class="form-control" name="confirm_password" placeholder="Confirm Password" />
</div>
<div class="form-group">
<label class="form-check-label"><input type="checkbox" name="accept_terms" /> I accept the <a href="#">Terms of Use</a> & <a href="#">Privacy Policy</a></label>
</div>
<div class="form-group">
<button type="submit" id="btnSubmit" class="btn btn-primary btn-lg">Sign Up</button>
</div>
<div class="alert alert-danger" role="alert" id="responseContainer">
</div>
</form>
<div class="hint-text">Already have an account? <a href="#">Login here</a></div>
</div>
</body>
<script src="https://code.jquery.com/jquery-3.5.1.min.js"></script>
<script src="https://cdn.jsdelivr.net/npm/popper.js@1.16.0/dist/umd/popper.min.js"></script>
<script src="https://stackpath.bootstrapcdn.com/bootstrap/4.5.0/js/bootstrap.min.js"></script>
<script type="text/javascript">
$(document).ready( function() {
/*@ Registration start */
$('#btnSubmit').click( function(e) {
e.preventDefault();
let formData = $('#registrationForm').serialize();
$.ajax({
method: 'POST',
url: 'processRegistration.php',
data: formData,
success: function (response) {
let res = JSON.parse(response);
$('#responseContainer').removeClass('alert-danger');
$('#responseContainer').addClass('alert-success');
$('#responseContainer').html(res.msg);
$('#responseContainer').show();
},
error: function (response) {
let res = JSON.parse(response.responseText);
$('#responseContainer').addClass('alert-danger');
$('#responseContainer').removeClass('alert-success');
$('#responseContainer').html(res.msg);
$('#responseContainer').show();
},
});
});
});
</script>
</html>
processRegistration.php
<?php

if ( !empty($_POST) && $_SERVER["REQUEST_METHOD"] === 'POST' && !empty($_POST['action']) && $_POST['action'] === 'registration' ) {

   /*@ Perform backend validation */
   $errors = '';

   $firstName = $_POST['first_name'];
   if ( empty($_POST['first_name']) ) {
      $errors .= '<li>First Name is required</li>';
   }

   $lastName = $_POST['last_name'];
   if ( empty($_POST['last_name']) ) {
      $errors .= '<li>Last Name is required</li>';
   }

   $email = $_POST['email'];
   if ( empty($_POST['email']) ) {
      $errors .= '<li>Email is required</li>';
   }

   if ( !filter_var($email, FILTER_VALIDATE_EMAIL) ) {
      $errors .= '<li>Invalid E-mail address</li>';
   }

   $password = $_POST['password'];
   if ( empty($_POST['password']) ) {
      $errors .= '<li>Password is required</li>';
   }

   $confirmPassword = $_POST['confirm_password'];
   if ( empty($_POST['confirm_password']) ) {
      $errors .= '<li>Confirm Password is required</li>';
   }

   if ( $password !== $confirmPassword ) {
      $errors .= '<li>Password & Confirm Password does not match</li>';
   }


   if ( empty($errors) ) {

      /*@ Save your data in database and return respose */
      http_response_code( 200 );
      echo json_encode( [ 'msg' => 'Your registration has successfully done' ] );

   } else {

      /*@ Return errors */

      http_response_code( 406 );
      echo json_encode( [ 'msg' => $errors ] );
   }

}
That’s it for now. We hope this article helped you to learn how to send AJAX PHP Post requests.
Additionally, read our guide:
- Best Way to Remove Public from URL in Laravel
- Error After php artisan config:cache In Laravel
- Specified Key Was Too Long Error In Laravel
- Active Directory Using LDAP in PHP or Laravel
- How To Use The Laravel Soft Delete
- How To Add Laravel Next Prev Pagination
- cURL error 60: SSL certificate problem: unable to get local issuer certificate
- Difference Between Factory And Seeders In Laravel
- Laravel: Increase Quantity If Product Already Exists In Cart
- How To Calculate Age From Birthdate
- How to Convert Base64 to Image in PHP
- Check If A String Contains A Specific Word In PHP
- How To Find Duplicate Records in Database
- How To Get Latest Records In Laravel
- Laravel Twilio Send SMS Tutorial With Example
- How To Pass Laravel URL Parameter
- Laravel 9 Resource Controller And Route With Example
- Laravel 9 File Upload Tutorial With Example
- How To Schedule Tasks In Laravel With Example
- Laravel Collection Push() And Put() With Example
Please let us know in the comments if everything worked as expected, your issues, or any questions. If you think this article saved your time & money, please do comment, share, like & subscribe. Thank you in advance 🙂. Keep Smiling! Happy Coding!


Way cool! Some very valid points! I appreciate you writing this write-up and also the rest of the website is extremely good. Elke Sullivan Ralston
Thank you 🙂
Thank you very much, it’s useful to me very much