In this tutorial, we will learn how to use Laravel DataTables step by step with an example. The Datatable is a very common functionality for most of the CMS.
Most of the DataTable plugin or package provides common functionalities like listing, filtering, searching, sorting, pagination, etc. If we create all these functionalities manually then it will take lots of time. Instead, we can use available Laravel DataTables like jQuery DataTable, yajra DataTable, etc. These two are mostly used in CMS.
Here I am going to share how can you easily install that package and use Laravel DataTables to list out the data. Are you ready guys?
Let’s start.
Please note that this Laravel Datatables demo has created in Laravel 8 version
Laravel DataTables Integration
01 Install Laravel
We are presuming that you already have a Laravel project set up on your machine either it’s a fresh installation or an existing Laravel application. If you don’t have it then run the following command to install a new Laravel application.
composer create-project --prefer-dist laravel/laravel datatable-demo
Or, you may install the Laravel Installer as a global Composer dependency after that you just need to run the laravel new datatable-demo to create a new Laravel application instead of the above long command.
composer global require laravel/installer

laravel new datatable-demo
You are now done with Laravel installations. Let’s move on next step.
02 Install Yajra Laravel Datatables Package
Most of the Laravel developers know the term “Packages”, if not then read the following definition:
A package is a piece of reusable code that can be dropped into any application and be used without any tinkering to add functionality to that code. You don’t need to know what is happening inside, only what the API for the class(es) are so that you can archive your goal
We don’t need to worry about the packages. It has some files and code inside it but one thing is for sure that it will solve our problem faster than we might think.
We hope you are now clear with the packages. Let’s go ahead.
Now, open your command-line tool and navigate it to the datatable-demo directory where we just installed the project. We are using Git Bash as a command-line tool, you can use your own or you can install Git Bash from here as per your OS: https://git-scm.com/downloads
Run the following commands:
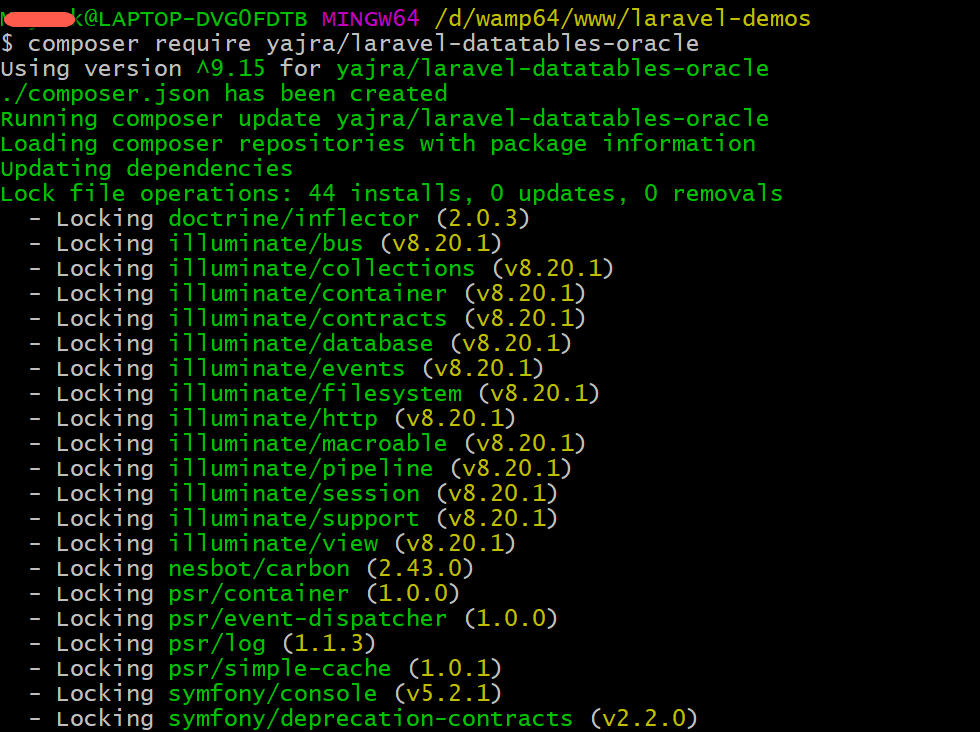
composer require yajra/laravel-datatables-oracle
Now, wait until your installation finishes the process
You are now done with packages installations. Let’s move on next step.
03 Register Service Provider In config/app.php
To register the service provider, open the config/app.php file. And add the following line in 'providers' array at the end
'providers' => [
 .....
 Yajra\DataTables\DataTablesServiceProvider::class,
]
Also, add the following line to the 'aliases' array at the end. You can use any aliases as you want like we have used ‘DataTables’ but you can also use aliases like ‘DT’, ‘myTable’, ‘Table, etc.
We shouldn’t worry about the aliases, It’s just a short form of service provider class so that we don’t need to write the whole path while using it in Controllers. Hope you are getting it. Great!
'aliases' => [
 .....
 'DataTables' => Yajra\DataTables\Facades\DataTables::class,
]
04 Dummy Records
Follow this step only if you don’t have enough data in your system else skip this step. We will create some dummy data with the help of inbuilt tinker tool. If you don’t know about tinker then read following definition and use.
The
php artisan tinkerprovides you a Psy Shell console. The tinker console allows you to interact with your application like you can generate fake data for your application, you can test Laravel relationship, you can perform CRUD operation on any Model (Create User, Delete User, etc.) and much more.
Hope you now got the basic idea of a tinker. Now, run the following command to enter into the tinker shell.
php artisan tinker
After entering into the tinker (REPL) shell, run the below command:
User::factory()->count(20)->create()
Above command will create new 20 users into our system. Let’s move ahead.
05 Register Route In routes/web.php
Open the routes/web.php file to add or register a new route. You can create routes as per your Controller and Method. Here, we have UserController, and in that, we have index() method. So now our route will look like as below:
Route::get('users', 'UserController@index')->name('users.index');
06 Create Controller
Let’s now create a controller. You can create it by copying any other controller code or run the following command in your command-line tool.
php artisan make:controller UserController -r
After running the above command a new file has been created into your app/Http/Controllers/UserController.php.
Open the controller file and write down the following code into it.
app/Http/Controllers/UserController.php
<?php

namespace App\Http\Controllers;

use Illuminate\Http\Request;
use DataTables;
use App\Models\User;

class UserController extends Controller
{
    /**
     * Display a listing of the resource.
     *
     * @return \Illuminate\Http\Response
     */
    public function index(Request $request)
    {
        if ($request->ajax())
        {
            $data = User::get();

            return Datatables::of($data)
                    ->addIndexColumn()
                    ->make(true);
        }
        return view('users');
    }
}
07 Create View
Now, create the users.blade.php file in resources/views/users.blade.php path.
<!DOCTYPE html>
<html>
   <head>
      <title>Laravel Datatables Tutorial | ScratchCode.io</title>
      <meta name="csrf-token" content="{{ csrf_token() }}"/>
      <link rel="stylesheet" href="https://cdnjs.cloudflare.com/ajax/libs/twitter-bootstrap/4.1.3/css/bootstrap.min.css" />
      <link href="https://cdn.datatables.net/1.10.19/css/dataTables.bootstrap4.min.css" rel="stylesheet">
   </head>
   <body>
      <div class="container">
         <h1 class="mb-5 mt-5">Laravel Datatables Tutorial | ScratchCode.io</h1>
         <table class="table table-bordered data-table">
            <thead>
               <tr>
                  <th>ID</th>
                  <th>Name</th>
                  <th>Email</th>
               </tr>
            </thead>
            <tbody>
            </tbody>
         </table>
      </div>
      <script src="https://ajax.googleapis.com/ajax/libs/jquery/1.9.1/jquery.js"></script>
      <script src="https://cdn.datatables.net/1.10.16/js/jquery.dataTables.min.js"></script>
      <script src="https://stackpath.bootstrapcdn.com/bootstrap/4.1.3/js/bootstrap.min.js"></script>
      <script src="https://cdn.datatables.net/1.10.19/js/dataTables.bootstrap4.min.js"></script>
      <script type="text/javascript">
         $(function () {
           var table = $('.data-table').DataTable({
               processing: true,
               serverSide: true,
               ajax: "{{ route('users.index') }}",
               columns: [
                   {data: 'DT_RowIndex', name: 'DT_RowIndex'},
                   {data: 'name', name: 'name'},
                   {data: 'email', name: 'email'},
               ]
           });
         });

      </script>
   </body>
</html>
Hurray! we are now done with all the steps. Now, run the below command to serve our application.
php artisan serve
Now, access the below URL in your favorite browser.
http://127.0.0.1:8000/users
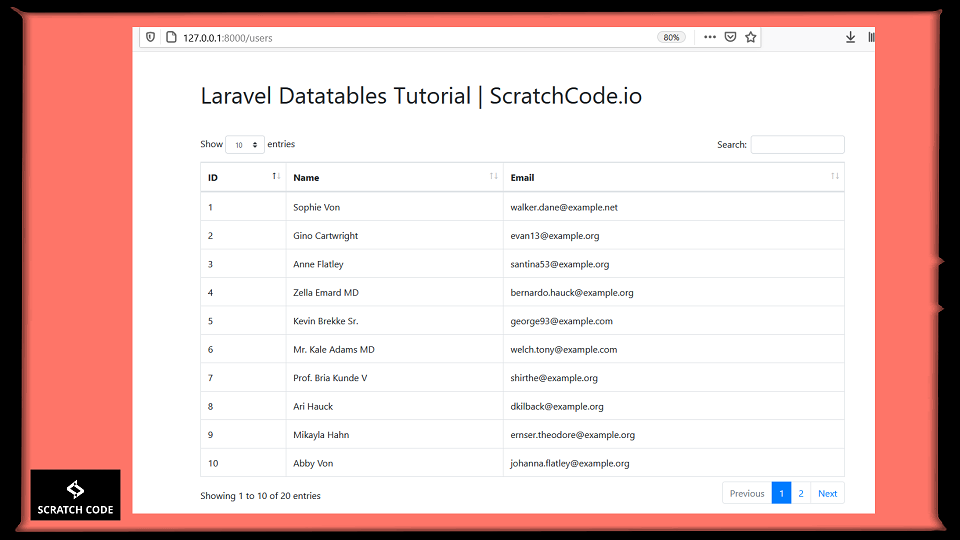
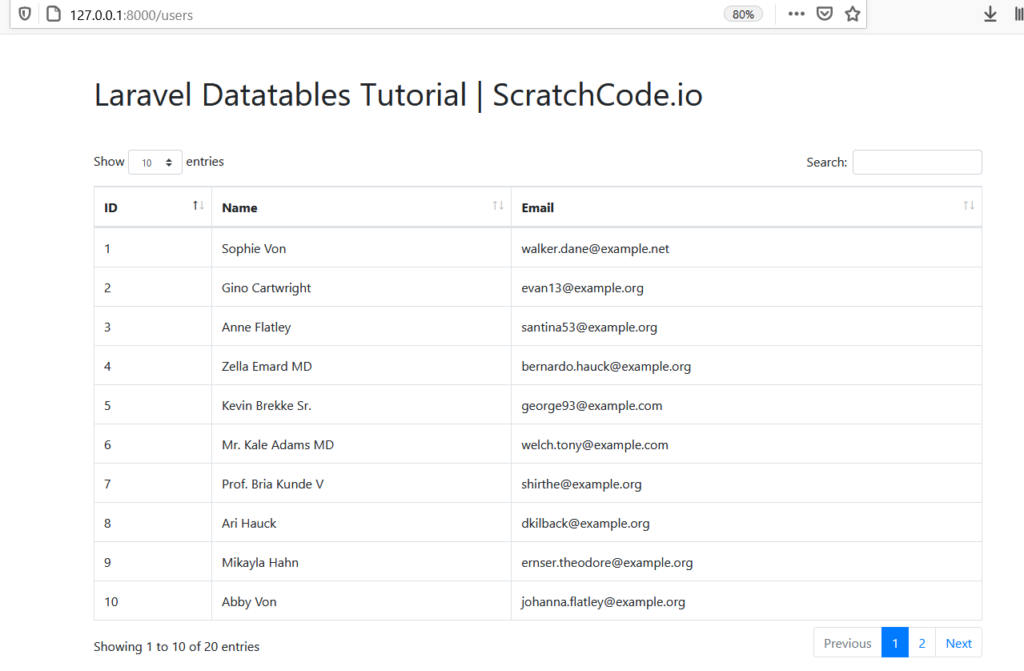
Laravel DataTables Output
You might be seeing the same output for Laravel Datatables as our like below:
Additionally, read our guide:
- Best Way to Remove Public from URL in Laravel
- Error After php artisan config:cache In Laravel
- Specified Key Was Too Long Error In Laravel
- AJAX PHP Post Request With Example
- How To Use The Laravel Soft Delete
- How To Add Laravel Next Prev Pagination
- cURL error 60: SSL certificate problem: unable to get local issuer certificate
- Difference Between Factory And Seeders In Laravel
- Laravel: Increase Quantity If Product Already Exists In Cart
- How To Calculate Age From Birthdate
- How to Convert Base64 to Image in PHP
- Check If A String Contains A Specific Word In PHP
- How To Find Duplicate Records in Database
- How To Convert Word To PDF In Laravel
- Laravel One To One Relationship Tutorial
That’s it for now. We hope this article helped you to learn Laravel DataTables.
Please let us know in the comments if everything worked as expected, your issues, or any questions. If you think this article saved your time & money, please do comment, share, like & subscribe. Thank you in advance. 🙂 Keep Smiling! Happy Coding!


Very interesting information!Perfect just what I was looking for! “Charity is injurious unless it helps the recipient to become independent of it.” by John Davidson Rockefeller, Sr..
We are very glad that it’s helpful to you. Thank you 🙂
Please consider adding information about the required database setup.
We will add more details as per the post requirement. Thank you for your feedback.